Singapore is located in Southeast Asia. Singapore shares land borders with Malaysia. The Singapore Strait serves as a maritime boundary between Singapore and Indonesia.
Binary Options Trading Singapore is permissible by law. But there are regulations that need to be followed, both by the brokers as well as the traders. In fact, Singapore is the 3rd largest hub for trading across the world. This entitlement was given to the Singapore trading hub with respect to the daily turnovers.

A vast amount of money was circulating within Singapore’s trading market, which brought in an economic opportunity. Therefore, a large amount of young and adult traders of Singapore decided to explore the available opportunities within the country. And they found Binary Options trading in Singapore to be the most proficient option to earn big.
All Singapore traders who have decided to start their trading journey with binary options must understand the process, country regulation, and method of approach. Without the right approach, you will be more likely to experience losses. Therefore, this guide is here to help all Singapore traders to master the art of binary options trading without violating any regulations.
What you will read in this Post
(Risk warning: You capital can be at risk)
What are Binary Options?
Binary Options puts up an opportunity for the traders to generate a consistent amount of profit. All of the smart traders who have the knowledge of this trading form are adapting it on priority. Singapore traders prefer trading with binary options every day.

Over this trading form, you get to trade with not just stocks or currencies but also on crypto assets, commodities such as gold & oil, and other such financial instruments.
Binary Options demand you to bet upon the price movement of an asset. You need to place your trade by predicting whether the market price will go up or down within a stipulated amount of expiry duration. If you win, you get the profit payout as per the specified percentage, but if you lose the prediction, you will also lose all of the capital you traded for the same.
Binary Options doesn’t assure you to earn a fortune in just one trade. You need to give it your time and understanding in order to learn more about the asset’s movement.
Hence, it will help you earn more and lose less. But the risks are evident and cannot be ignored entirely. Therefore, take all the necessary measures to practice the strategies and prevent risk factors.
(Risk warning: You capital can be at risk)
Are Binary Options legal in Singapore?
Binary Options Trading in Singapore is legal, and there are no such regulations that prevent you from trading upon it. But the only thing you must know is that not all brokers have the license and permission to trade with binary options in Singapore. The brokers who intend to offer their binary options trading services in Singapore must obtain a license from MAS.

MAS (Monetary Authority of Singapore) is the financial service regulator authority of Singapore. Singapore has a large group audience who are knowledgeable and passionate about trading. And that is the potential that brokers utilize in order to take their business to this country. The unregulated brokers also make way to this opportunity and scam the Singapore traders. But with MAS imposing regulations, this is about to stop.
There are no specific local brokers to offer you Binary Options Trading in Singapore.
You need to rely upon the offshore brokers to avail of the trading service. The traders need to ensure that they check the licensing evidence of the brokers by connecting with the resources of the regulatory body. When you have the evidence regarding the choice of the right broker, you can go ahead and commence with your Binary Options Trading in Singapore.
How to trade Binary Options in Singapore?
Trading binary options in Singapore is not a difficult task. You just need to keep in mind to work with an ideal broker.

When you choose your broker, the next thing you need to do is follow the below steps:
- You need to sign-up and make a minimum deposit as per the requirement of the broker platform. The minimum deposit amount varies from broker to broker. Therefore, go with the one that has an amount, which fits your initial trading budget.
- Now, you will have the price chart on your landing page. Choose the asset on which you intend to trade. Whether it is currencies, commodities, stocks, or others, you need to choose one to get the market price fluctuation over the chart.
- Then you need to choose the trading amount that you intend to invest. Most of the brokers have kept their initial trading amount of $1, but that again varies from broker to broker. If you are a beginner, then it is better for you to start with a low investment and gradually increase it in the long run.
- Choose the expiry duration as short or long-term, depending upon what the broker platform has to offer.
- When you are over with that, you should predict whether the market price of your selected asset will rise or fall within the expiry duration you chose. Click on the respective prediction buttons, and your trading investment is made.
- Now, you need to wait for the expiry duration to end, while you can regularly monitor the chart to see if your prediction is going in the right direction or not.
- If your prediction is right then, you get the profit as per the asset’s payout percentage. But if your prediction is wrong, you will lose all that you traded.
Apart from the ideal steps of approach for Binary Options trading in Singapore, it is important for you to consider some choosing factors to ensure that you are getting along with a genuine broker.
The things that you should consider in order to choose a proficient broker are:
- Firstly, check the licensing of your broker to be regulated as per the Singapore guidelines. MAS should have regulated the broker to operate within the country.
- Check up on the features, bonuses, and indicator tools that the broker platform is offering you. It would help if you preferably went with the broker with bonuses and rewards for sign-up and deposits. It will benefit you further with your binary options trading.
- Check whether the broker platform has a demo account or not. As of today, all of the binary options broker platforms must have a demo account to give a learning scope to beginners. Moreover, the professionals use the demo account to get used to the interface of the platform.
- You would not want to go through hassles for depositing or withdrawing your funds to/from the broker account. So, check the deposit and withdrawal options to match your flexibility and convenience.
- Finally, you should get an idea of the overall experience that the binary options brokers have in terms of offering ideal service to their customers. Moreover, make sure you read their specific terms and conditions to get an idea of what hidden terms they wish to impose on their clients and customers.
Hence, this is the ideal way of approach for you to carry out Binary Options Trading Singapore.
But, consider following this article till the end to get a clear insight into the regulations and measures imposed by MAS for Singapore traders and offshore brokers, in association with binary options trading.
(Risk warning: You capital can be at risk)
Best 3 binary brokers and platforms in Singapore
Save your search and analysis for the best binary brokers. Instead, utilize it to improve your trading skills to maximize your profit. This guide puts up the top three binary options brokers that are offering their trading services to Singapore traders.
Watch out: These are the top three Binary Options brokers in Singapore:
100+ Markets
- Min. deposit $10
- $10,000 demo
- Professional platform
- High profit up to 95%
- Fast withdrawals
- Signals
100+ Markets
- Professional platform
- Free demo account
- $10 minimum deposit
- Webinars and education
- High payouts
100+ Markets
- Accepts international clients
- High payouts 95%+
- Professional platform
- Fast deposits
- Social Trading
- Free bonuses
100+ Markets
- Min. deposit $10
- $10,000 demo
- Professional platform
- High profit up to 95%
- Fast withdrawals
- Signals
from $10
(Risk warning: Trading is risky)
100+ Markets
- Professional platform
- Free demo account
- $10 minimum deposit
- Webinars and education
- High payouts
from $10
(Risk warning: Trading is risky)
100+ Markets
- Accepts international clients
- High payouts 95%+
- Professional platform
- Fast deposits
- Social Trading
- Free bonuses
from $50
(Risk warning: Trading is risky)
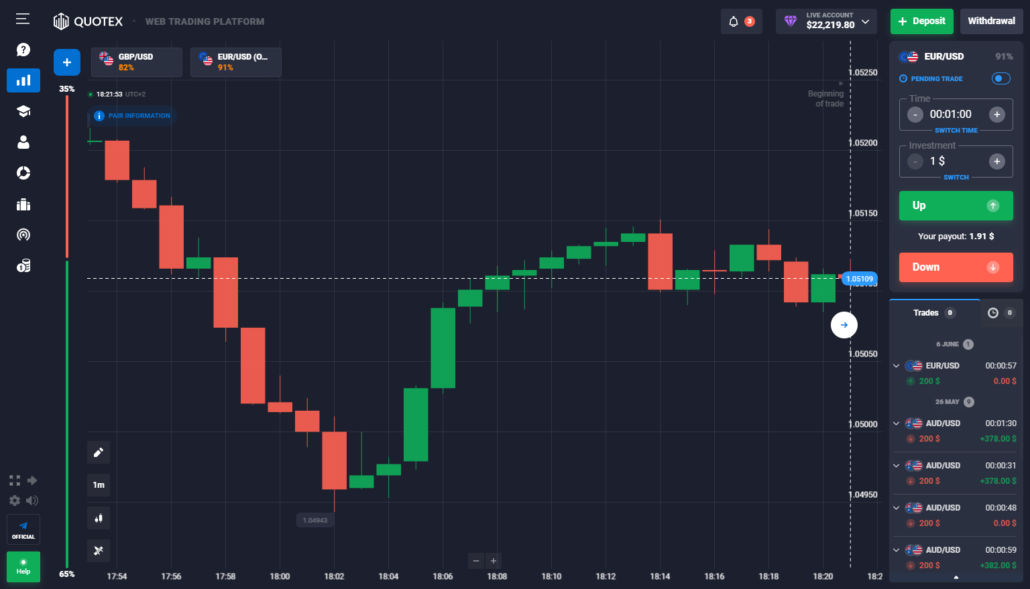
#1 Quotex
Quotex is one of the best platforms for Binary Options trading in Singapore. The minimum deposit amount for this platform is just $10, and the minimum trading amount is $1. Quotex.io is under the regulation of IFMRRC and accepts payment from all of the available methods to make it convenient for you.

In addition to that, Quotex.io offers you up to 100% payout based on the different assets and their liquidity concerns. This platform has a big chart as a display over its landing page. The chart has asset pricing, which is powered by several indicator tools to help you make an accurate prediction.
In addition to that, Quotex.io has over 15 drawing tools to inform projections over the chart to prepare investment strategies. Also, copy trading is a prominent feature within this platform that allows leveraging the potential of duplicating the trading pattern for most successful traders.
(Risk warning: Your capital can be at risk)
#2 Olymp Trade
Olymp Trade is not just accepting individuals who wish to start Binary Options trading in Singapore but is also one of the best broker platforms among the list of hundreds. In fact, Olymp Trade demands only $10 as the minimum deposit amount. It is under the regulation of FinCom, which proves its genuineness across the globe.
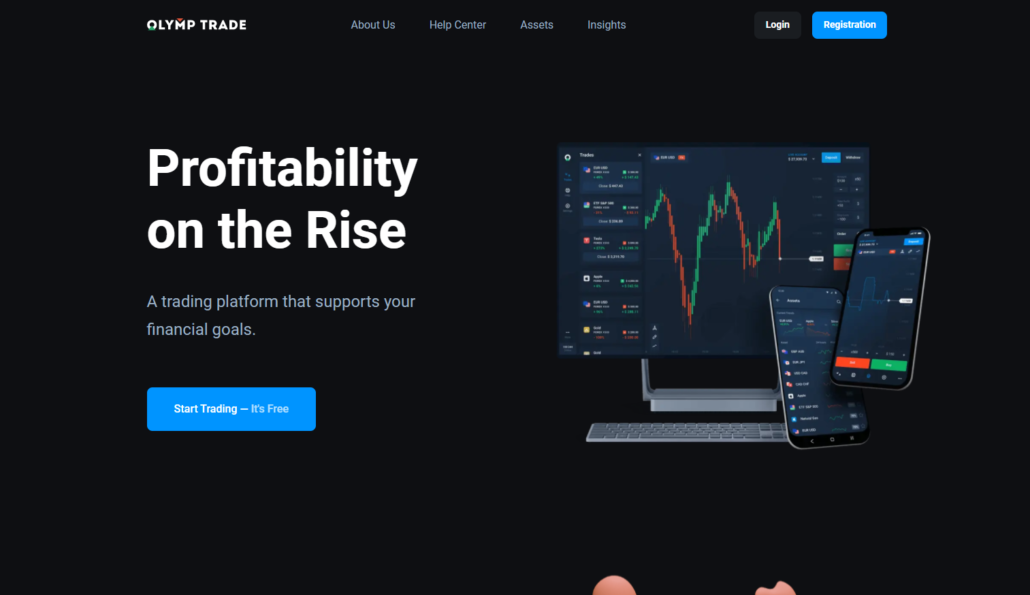
Olymp Trade is offering a maximum payout of 95% for its assets, depending upon the financial fluctuations and performance in the market. In fact, you get to trade with Forex, Binary Options, Stock, Cryptocurrencies, and Commodities over Olymp Trade. It has a dedicated mobile application for your Android or iOS device to help you trade with binary options anywhere and anytime.
Olymp Trade comes with indicator tools for technical analysis of the asset price and charting tools to inform projections. Collectively, Olymp Trade has everything that a Singapore trader needs to start their trading journey.
(Risk warning: You capital can be at risk)
#3 Pocket Option
Pocket Option is yet another unique and top-of-the-line broker platform that helps you leverage the maximum potential of Binary Options Trading in Singapore. It offers a maximum profit payout of 96% for its assets. The payout percentage might change, depending upon the fluctuating performance of the market.

Also, you need to make a minimum deposit of $50 in order to start using this platform. The deposit is higher than the other two options because the Pocket Option offers a deposit bonus of 50% on every $50 or above payment. The higher you deposit, the higher the bonus will be.
In addition to that, here, you get to trade with over 100 assets, such as commodities, stocks, currency pairs, and crypto. You have the mobile application for Pocket Option to ensure that you can trade binary options without any location or time barriers.
(Risk warning: You capital can be at risk)
Financial regulations in Singapore
Binary Options Trading in Singapore is legal and is approved by the law. But the regulations are quite mandatory to be followed by the involved parties. The financial markets of Singapore are under the regulation of MAS (Monetary Authority of Singapore). This agency came into action in 1971 and is working effectively in order to regulate all of the sectors within the industry that offers financial services to citizens of Singapore.

The MAS authority is also responsible for serving the Singaporean Central Bank, with regulations and guidelines. This regulatory department is not just for the individual financial markets but also for the payment systems that are meant to offer services to these markets. Therefore, the Binary Options trading in Singapore is also bound to follow the implications that this authority has imposed on it.
MAS has given a statement of regulation on how binary options trading will progress in Singapore. Moreover, the regulation has also stated the involvement of participants and brokers in this trading format. In addition to that, MAS has put up several investor alerts over the websites and has put up warnings for the investors about trading with unregulated brokers of binary options trading.
Most of the warnings went in vain, and the Singapore binary options traders are still falling into the trap of the unregulated binary options brokers, thereby losing all of their money.
As most of the traders prefer to rely upon offshore brokers, it is important for such platforms to adapt the country-wise regulations to offer their services.
Hence to ensure that this doesn’t happen ever again, MAS has planned to set up two tools. These tools will make sure that Singaporean traders stay safe from all kinds of scams.
(Risk warning: You capital can be at risk)
The tools are as follows:
- MAS is now adapting measures to maintain Financial Institutions Directory. This directory consists of a list of all the financial services companies and binary options brokers that have ideal regulations imposed by MAS. Hence, this will enable all of the Singapore traders to make their quick checks and analysis upon any selected broker before choosing it for trading needs. All of the brokers who have MAS regulations will be listed over this directory! This tool aimed to get rid of the fake claim instances of the brokers.
- MAS also keeps track of the Investor Alert List. This list has the names of brokers that MAS blacklists for their false claims of regulation and scam activities.

Apart from that, the MAS website also consists of educational documentation to guide Singapore traders about binary options. Before you go ahead and invest in Binary Options trading in Singapore, it is essential for you to know what they really are. Therefore, MAS has taken this initiative to guide the traders through educational documentation over the website.
(Risk warning: You capital can be at risk)
Education for Singapore traders
The only point of education that the Singapore traders need to have is their idea of capital investment. All of the traders who are starting fresh with Binary Options trading in Singapore must understand that it comes with certain risk possibilities. Therefore, you should start with low capital for your initial trades.

You need to judge the market fluctuation of an asset in order to invest a significant amount in it. The broker you chose might have a certain minimum trading amount, which you should use for the start. In addition to that, it is important for the traders to observe the results of their initial trades.
The initial wins and losses will help you predict the asset’s price movement in the long run. And, when you observe an identical fluctuation of the price after several hits and trials, you can then predict with analysis and strategies. If you do not want to invest your real funds at the beginning, you can always go ahead with the demo accounts to practice your strategies.
But it is advisable that you make an approach to take some hits & trials over the live trading account. In this way, you will be able to maximize your profit and minimize the losses in the long run for Binary Options trading in Singapore.
Conclusion: Is Binary Options trading legal in Singapore? – Yes
If you are a passionate trader and want to commence with Binary Options trading Singapore, then this guide is an adequate informative piece for you. Consider the three broker options, as they are comparably the best among all.

In fact, they are under the regulations of MAS and are already operating with several Singapore traders. You get impeccable features and bonuses to enhance your prediction accuracy over this trading format.
(Risk warning: You capital can be at risk)
Frequently Asked Questions:
How to check the Status of a Binary Options Broker in Singapore?
The MAS maintains a dedicated list of all financial services companies with a Capital Markets Services License. Besides, it also has an investor list that blacklists all brokers that have made false claims of having MAS licensing.
Can Binary Options make a trader rich?
Binary options trading is a profitable investment as compared to other assets. Thus, it is safe to say you can become rich with binary options. However, it is not a one-off thing. A solid strategy, proper knowledge, and long-term commitment are needed to become successful.
How does FMA officially define Binary Options Brokers in Singapore?
Binary options brokers in Singapore ideally serve the purpose of derivative trading investment firms. Thus, FMA’s official designation for them is a “derivatives issuer.”
Is it legal for me to trade binary options using overseas firms as a Singaporean?
While the MAS encourages Singaporean traders to use binary options brokerages that hold a Capital Markets Services Registration, however trading with approved overseas brokerages is not prohibited.


